 字體:小 中 大
 |
|
|
|
| 2009/02/24 08:38:54瀏覽1291|回應63|推薦0 | |
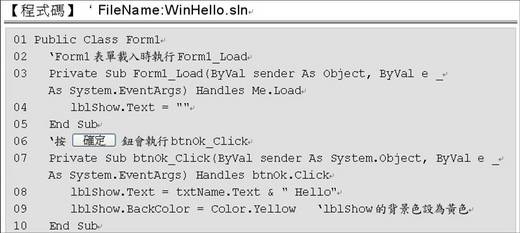
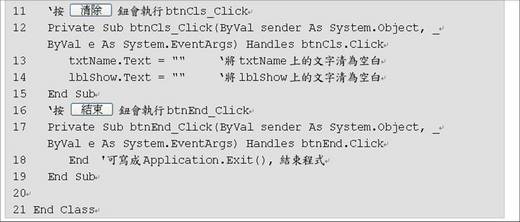
and we will see the demo video of how to operate with the VB to create the user interface with the object inside of the toolbox! topic:How to: Creating Your First Visual Basic Program Step 1: Create a Project in Visual Basic When you start Visual Basic 2005 Express Edition, you'll see the integrated development environment, or IDE for short. To create a project, click File, then click New Project, and in the New Project dialog box, select Windows Forms Application. Since this is the first application that you’re creating, it automatically names it WindowsApplication1. Click OK, and it will create your project. Now notice it created a form called Form1 in an area of the IDE known as the form designer, and all of the required files are located in an area of the IDE called Solution Explorer. Now this is all that was needed to create a project in Visual Basic. Step 2: Create a User Interface Next, you create the user interface of your application. To add controls to your application, you can drag the controls from the Toolbox. In my IDE, the Toolbox is hidden, so I'll point to the Toolbox tab on the sidebar to open it, and I'll pin it into place so it's easier to use. If for some reason the Toolbox is not visible at all, not even in the sidebar, click the View menu, and then click Toolbox, and it will open. Notice that you can open other windows from this menu, such as Solution Explorer and the Properties Window. I'll click the All Window Forms tab to see a list of all of the Windows Forms controls that are available to me. Currently, I have them in alphabetical order, but if yours are not in alphabetical order, you can right-click and then select Sort Items Alphabetically. I'll scroll down and click a Panel control and drag it to the upper left-hand corner of my form. I'll use the panel control to hold my user input controls in a defined area that is separate from the WebBrowser that I want to have in the lower part of the form. Now I'll get a Textbox control and place it directly on top of the panel control. Now I'll drag a Button onto the panel, and I can move the button by clicking it, and then dragging it to a new area and releasing the mouse button. Finally, I'll drag a WebBrowser control and put it below the Panel. It doesn't look very good now, but in the next step you'll learn how to customize the look and behavior of your application. Step 3: Customize Looks and Behavior To set the properties of your controls, you can select the control on the forms designer. I’ll select the Panel control. Notice that the Properties window of the IDE lists all of the properties for the selected control, such as the Size or Visible property. I want to set the position by using the Dock property, so I'll select Dock, and then I'm going to click this drop-down arrow, and it gives me the option to dock the control to the top, left, right, or bottom, or I can fill all the available space. I'm going to choose Top. And notice that the Panel control is docked to the top of the form, and expands to the entire width of my form. To change its size, I’ll set the Height property to 50. Next, I’ll select the WebBrowser control, and set its Dock property to Fill by clicking the center box. This will cause the WebBrowser control to resize automatically if I resize the form. Since this application is going to be a Web browser, I want it to be a little bit bigger than the default form size. So I'm going to select the form—notice the sizing handles—and I'm going to click this corner sizing handle and just drag it down to resize the form. Next, I'll select the button and then set the Text property by typing Go with an exclamation mark. When I press the Enter key, notice that it changed the name on the button. Next, I'll select the text box and then select one of the sizing handles and drag it to the right, so that it can accommodate a long Web site URL, if I type one in. Now it looks the way I want it to, but it doesn't do anything. In the next step, you'll learn how to make the browser work by adding some Visual Basic code to your application. Step 4: Add Visual Basic Code In this step, I'll show you how to add some instructions for how the program should work. You add these instructions by adding Visual Basic code to your application. In the form designer, I’ll double-click the Button control, and it will open up a new window called the Code Editor. Now notice that there is already some code here, and the cursor is between these two lines—the top one says "Private Sub Button1 underscore Click" and then there’s some variables in parentheses and the bottom one says "End Sub". Most of the code you write will be inside Sub procedures like this one. These procedures react to, or "handle," events—in this case, clicking the button, as the name implies. So whenever a user clicks Button1, the code that you type in this area will run. So to add the code that makes the Web browser read a URL from the text box and then display the Web page, type WebBrowser1 (that's the name of the WebBrowser that we added). I’ll type a period, or dot, and then type Navigate. I’ll add a parenthesis and then type TextBox1 (The name given to the TextBox we added to the form) DOT Text, and then end parenthesis: WebBrowser1.Navigate(TextBox1.Text) Now if you don't understand what this code means, don't worry too much about it right now, you're going to learn a lot more about writing code in later lessons.
|
|
| ( 知識學習|隨堂筆記 ) |


